Uber Eats Photos That Sell: The Simple Upgrade Path
If you want to increase Uber Eats sales, the highest-leverage thing you can change isn’t your prices or your hours — it’s your photos. Uber Eats is mobile-first, and on a small screen the thumbnail decides the tap before anyone reads a description. A bright, clear, accurate hero image wins the scroll; a dim or cluttered one loses it. The good news: upgrading your delivery photos is one of the cheapest, fastest growth levers a restaurant has, and you don’t need a photographer to do it.
This is the simple upgrade path — what to shoot, how to frame it, and a weekly workflow that keeps the whole menu looking fresh.
Why photos drive Uber Eats orders
Picture the customer experience. They open the app hungry, scroll a rail of forty near-identical tiles, and decide in well under a second per item. They’re not reading. They’re scanning images. On a delivery app, the photo isn’t decoration — it’s the storefront, and the thumbnail is the sign in the window.
That means a photo upgrade isn’t cosmetic. It directly affects how many people tap into your item, and tapping in is the first step to ordering. A listing where every dish reads instantly at thumbnail scale will pull more taps than one where half the tiles are murky or confusing — even with identical food and pricing.
What Uber Eats customers respond to
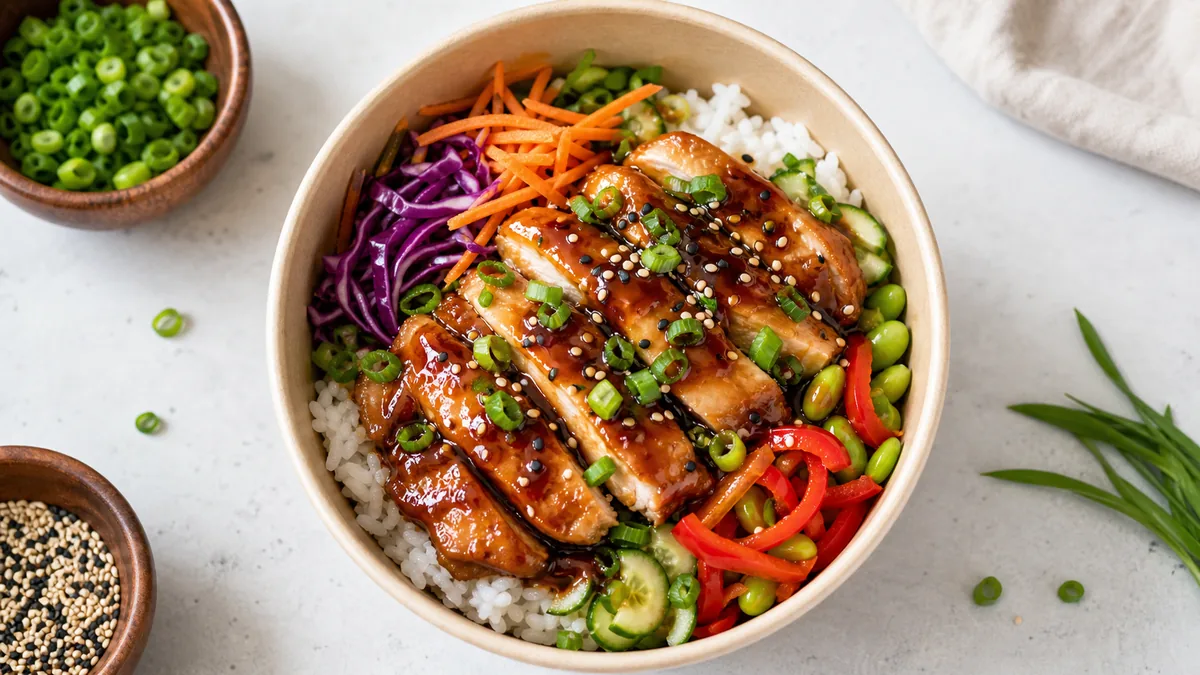
Three signals do most of the work:
- A clear hero ingredient. The customer should know what the dish is in a glance, with no squinting or confusion.
- Clean edges and backgrounds. Clutter, messy tables, and busy backdrops make food look cheap and unappetizing.
- Accurate color. Food that looks natural reads as trustworthy. Over-saturated or filtered food reads as fake — and fake food is a refund waiting to happen.
Notice that none of these require a studio. They require good light, a clean frame, and honest color.
Frame for the crop, not the full image
The most common reason a good photo fails on Uber Eats is the crop. Uber Eats recommends a landscape crop between 5:4 and 6:4, and the app may still preview that image in tight tiles across the menu rail. A beautiful 16:9 shot can lose its garnish or hero ingredient if the subject sits too close to the edge.
The fix is to design for the tightest crop first:
- Shoot a little wider than you think you need, so there’s room.
- Keep the hero ingredient centered and large.
- Export both a square crop and a 3:2 crop from the same master image.
- Preview each as a small thumbnail before you publish.
For the full per-platform crop and resolution details, see the delivery app photo guidelines and image sizes.
A weekly workflow that scales
Consistency beats one perfect photo. Build a small, repeatable routine:
- Shoot new items and specials once per week in one consistent setup — same surface, same light, same angle logic.
- Enhance and export the correct crops (square + 3:2, plus web and social if you reuse the assets).
- Replace and preview the photos on your listing, checking each as a thumbnail before going live.
The bottleneck in this loop is almost never shooting — it’s the rework: relighting dim phone shots, cleaning backgrounds, and re-cropping for each surface. FoodPhoto.ai removes that step by enhancing a real phone photo of your real dish and exporting menu-ready crops in minutes, so a weekly batch actually fits into a busy week. You can run one of your current Uber Eats photos through a Menu Test Pack to see the before/after on your own food.
Common mistakes to avoid
- Heavy filters that change color. They trade short-term “pop” for long-term distrust and refund risk.
- Tight framing that gets cropped badly. Always leave room and design for the square thumbnail.
- Mixing five different styles across one menu. Inconsistent backgrounds and lighting make a listing look disorganized and amateur. Pick one look and hold it.
- Letting top sellers go stale. Refresh your best-selling items monthly so they always look their best.
Keep it honest
Better photos work because they earn trust, and trust is fragile. Enhance lighting, background, and crop — never the dish itself. If the box doesn’t match the picture, you’ll get one-star reviews and chargebacks that cost far more than any extra tap was worth. Accurate, appetizing, and consistent is the combination that lifts both orders and repeat orders.
If you want to extend this beyond Uber Eats, the same weekly discipline powers a restaurant social media content calendar, and the restaurant ads creative playbook shows how to turn these same photos into paid creative.
Where to start if your whole menu needs work
You don’t have to fix everything at once — and you shouldn’t. Sequence the upgrade so the highest-impact items improve first:
- Start with your top 5-10 sellers. These drive most of your orders, so a clearer photo here moves the most revenue. Pull the list from your Uber Eats dashboard, not from memory.
- Fix the worst offenders next. Any dish with a dim, blurry, or missing photo is actively costing you taps. A clean image is a bigger jump than a “good to great” upgrade elsewhere.
- Standardize the rest over a few weeks. Work through the remaining items a batch at a time so the whole menu eventually shares one consistent look.
This order means you see the sales impact early, which makes it easier to keep the routine going.
A quick QA pass before you publish
Before any photo goes live on your listing, run a five-second check:
- Is the dish obvious at thumbnail size? Shrink it and confirm.
- Are the edges and background clean? No clutter, no messy table.
- Does the color look natural? No neon saturation or heavy filter.
- Is the hero ingredient centered and safe from the crop? Preview both the square and the item-page version.
If a photo fails any of these, it’s not ready. A listing where every tile passes this check converts better than one where a few “good enough” photos drag down the whole menu. For a broader version of this discipline, the menu photo audit checklist covers the fixes worth making first.
Upgrading your Uber Eats photos is one of the rare moves that’s cheap, fast, and directly tied to orders. Shoot bright and clean, frame for the crop, run a weekly batch, and keep it honest. When you’re ready to turn phone shots into menu-ready images, start with a $10 Menu Test Pack on the pricing page.
Need consistent menu photos without a full reshoot? Start with real dish photos and improve lighting, background, and platform-ready crops in the FoodPhoto.ai studio.
FAQ
Do better photos actually increase Uber Eats sales?
Photos are the single biggest lever on a mobile-first delivery app because the thumbnail decides the tap. Customers scroll dozens of tiles and choose almost entirely on the hero image. Bright, clear, accurate photos that read at thumbnail size win more taps than dim, cluttered, or inconsistent ones — which is why upgrading photos is one of the cheapest ways to lift orders.
What crops do I need for Uber Eats photos?
Export a square crop and a 3:2 (4:3-style) crop from one master image so both the menu rail thumbnail and the item detail page look good. Designing for the tighter crop first prevents the platform from slicing off your garnish or hero ingredient.
What's the most common Uber Eats photo mistake?
Three mistakes dominate: heavy filters that change the food's real color and erode trust, tight framing that gets cropped badly into a thumbnail, and mixing five different photo styles across one menu so the listing looks disorganized. Fix those and most listings improve immediately.
How often should I refresh my Uber Eats photos?
Run a weekly batch for new items and specials, and refresh top sellers monthly. A consistent photo station makes this take minutes. Update any item whenever its plating, ingredients, or packaging changes so the photo always matches what arrives.