How to Photograph Drinks & Cocktails on a Phone (2026): Glass, Ice, Reflections, and “Cold”
Drinks are the toughest subject in a phone camera. Glass reflects the whole room, ice clouds and melts within minutes, and condensation either looks like a fresh pour or a sweaty mess depending on your timing. But photographing drinks and cocktails on a phone is very doable once you treat glass as a mirror you control. This 2026 guide gives you a repeatable setup for clean, cold-looking drink photos you can shoot at the bar during a slow hour.
The goal isn’t an art shot. It’s a menu-ready image that reads instantly on a phone thumbnail and makes someone tap “add.”
Why drinks break phone cameras
A drink photo has to solve three problems at once: a reflective surface (glass), a fragile prop (ice), and a moving target (condensation, foam, fizz). Get any one wrong and the whole image looks cheap. The fix is sequencing — set the scene, control reflections, then add ice and garnish at the last second.
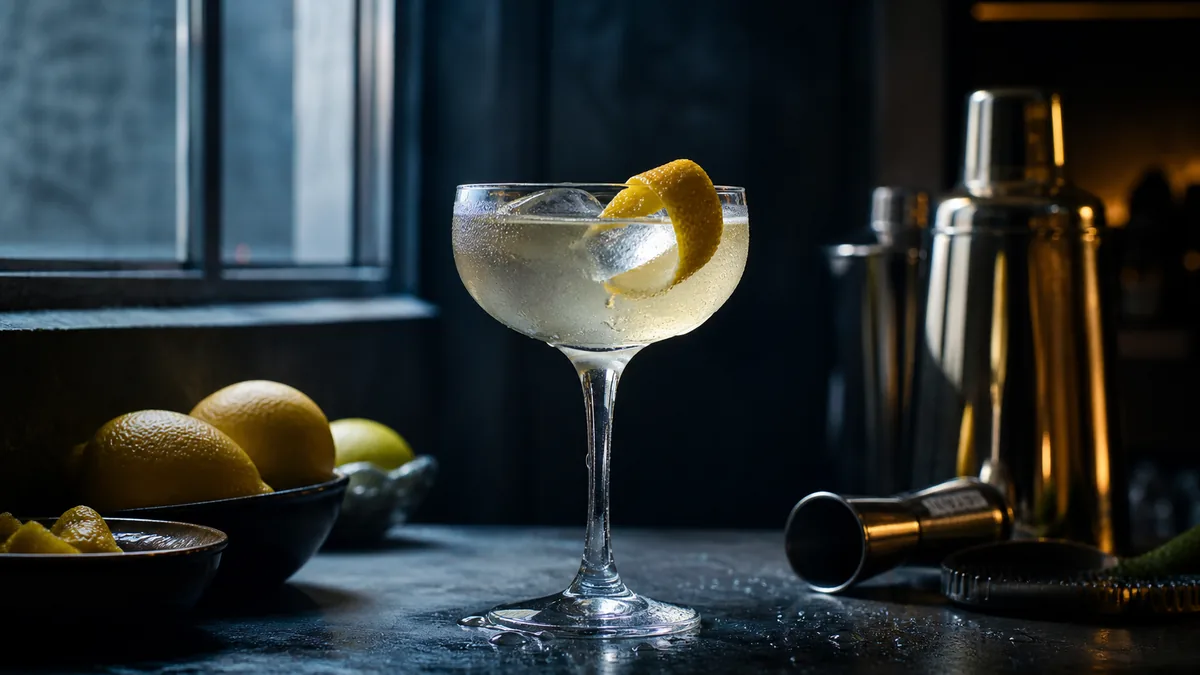
Step 1: Control what the glass reflects
Glass shows everything around it, including you and your phone. To clean it up:
- Shoot in a darker pocket of the room with one main light, not under every bar light at once.
- Put a light to the side or slightly behind the glass so it rims the liquid and ice instead of bouncing off the front.
- Wear dark clothing and stand back; use the optical zoom if you have one.
- Block stray reflections with a piece of black card or a folded black napkin behind the camera. A second white card opposite the light fills the shadow side.
The single biggest upgrade for drink photos is removing the ceiling-light dots and window squares from the glass. Once those are gone, the drink looks intentional.
Step 2: Make the ice look clean
Cloudy, half-melted ice ages a drink instantly.
- Use fresh, clear cubes (clear ice or photo-grade cubes if you’re doing a hero shot).
- Add ice last, right before the shot, so it hasn’t started to fog.
- Backlight or side-light the cubes so they glow and show their edges.
- Keep a backup glass of ice ready; swap if it clouds between takes.
Step 3: Sell “cold” with condensation
Condensation is the cue that says refreshing. You can fake fresh dew cleanly:
- Wipe the glass spotless first.
- Mix a little water (some stylists add a touch of glycerin for staying power) in a spray bottle.
- Mist lightly from a foot away just before you shoot, so the droplets are even and small.
- Shoot immediately — real condensation runs and pools within a minute.
Step 4: Pick the angle and frame
- Eye level or 15-30° down for most glassware — it shows the silhouette of the glass and the liquid color.
- Overhead only for flat builds (layered iced coffee, a garnished punch bowl, a flight from above).
- Frame so the garnish is visible and the rim is clean. Leave a little headroom for delivery-app and social crops.
For the broader framing logic that applies to food and drinks alike, our menu photo composition rules cover the few rules that make any image read as “orderable.”
Step 5: Garnish and styling details
- Add citrus twists, herbs, and skewers last and keep them crisp.
- Position the garnish toward the light so it catches a highlight.
- Wipe drips off the glass and the bar before the shot.
- For foamy or layered drinks, shoot fast — head and layers settle quickly.
Step 6: A clean two-minute phone edit
| Adjustment | What to do |
|---|---|
| Crop/straighten | Level the liquid line; trim distractions |
| Exposure | Lift slightly if the bar was dim — keep highlights intact |
| White balance | Cool it down if the bar light was orange; ice should look neutral, not yellow |
| Contrast | Small bump (+10-15) to separate glass from background |
| Saturation | Gentle — a vivid cocktail should still look real |
| Sharpen | Subtle, to define ice edges and garnish |
Avoid heavy filters; they make liquids look murky. Keep the drink’s real color — a margarita stays pale green, not radioactive.
Step 7: Export menu-ready crops
You’ll usually need more than one shape:
- A near-square crop for delivery apps and Google.
- A vertical crop for Reels and Stories.
- A wider crop for the website drinks page.
Shoot a touch loose so you can crop all three from one frame. For platform-specific sizes and the no-rework export approach, see our cross-platform delivery photo checklist.
A cheat sheet by drink type
Different drinks have different “tells” — the one thing that makes them look right. Lead your composition with that:
| Drink | What sells it | Watch out for |
|---|---|---|
| Cocktail (stirred/shaken) | Clear ice, crisp garnish, clean glass | Reflections in the bowl of a coupe |
| Beer | Foam head, color through the glass, condensation | Flat head — pour fresh, shoot fast |
| Iced coffee / latte | Layered milk-and-coffee gradient | Cloudy ice; shoot before it melts the layer |
| Wine | Color and clarity, the curve of the glass | Fingerprints and dust on the bowl |
| Frozen / blended | Texture and that “just-blended” peak | Melt — keep it in the freezer until the last second |
| Hot drinks (latte art, tea) | Steam, the art on top, the cup | Steam fades fast; backlight it and shoot immediately |
The pattern across all of them: the hero detail is fragile and time-sensitive, so build everything else first and add the perishable element last.
Common drink-photo mistakes
- Shooting under every bar light at once. Multiple light sources mean multiple reflections and mixed color. Kill the extras and use one main light.
- Letting ice fog before the shot. Cloudy ice is the fastest way to age a drink. Add it last, or keep a fresh backup glass.
- Heavy filters on liquid. Saturation sliders turn a real margarita radioactive and make juice-based drinks look syrupy. Keep the color true.
- Forgetting the bar surface. Drips, rings, and crumbs on the counter are as distracting as a messy background. Wipe the bar, not just the glass.
- One crop only. If you only frame for the website, you’ll have nothing for the delivery thumbnail. Shoot loose and crop later.
Where AI enhancement helps with drinks
Bars are dark, busy, and full of clutter — the exact conditions that make phone drink photos hard. When a shot is close but the background is messy or the glass picked up a reflection you couldn’t kill, FoodPhoto.ai cleans it up: it balances the light, tidies the background, and improves gloss and clarity without changing the actual drink. That’s the honest part — it enhances the real cocktail you poured rather than generating a fake one. Run one of your toughest drink shots through the Menu Test Pack and compare.
For drink and food photography that needs to scale across a full menu, FoodPhoto.ai pricing starts at ten photos for $10, with plans from $15/month — credits roll over and you can cancel anytime. Shoot the cold, keep the glass clean, and let enhancement handle the polish.
Frequently asked questions
How do I photograph drinks on a phone without reflections?
Control what the glass can reflect. Shoot in a darker area with one soft light to the side, wear dark clothing, and keep bright windows and ceiling lights out of the glass’s line of sight. A small piece of black card behind the camera removes most stray reflections.
How do I make ice look clean in photos?
Use fresh, clear ice (or photo-grade clear cubes), add it right before shooting, and light from the side or back so the cubes glow. Wipe the glass, then mist it lightly with water for fresh condensation just before the shot.
What angle is best for cocktail and drink photos?
Eye level or a slight 15-30 degree downward angle works for most glassware because it shows the glass shape and the liquid color. Save overhead shots for flat builds like a layered iced coffee or a garnished tiki bowl.
Can AI fix a drink photo that has bad reflections or a messy background?
Yes. FoodPhoto.ai enhances the real photo you took — cleaning the background, balancing light, and improving gloss — without changing the actual drink. It’s honest enhancement, so the cocktail in the shot is still the one you poured.