BBQ & Grill Food Photos on a Phone (2026): Smoke, Char, Gloss, and “Juicy” Without Losing Detail
BBQ sells at a higher price because it looks like work: smoke, char, bark, glaze, and time. But it is also one of the easiest categories to photograph badly on a phone. Dark meats go muddy, sauces blow out into harsh glare, and smoke turns into gray fog. This guide shows a repeatable phone workflow for how to photograph BBQ that keeps dark foods detailed, sauce highlights clean, and every shot crop-safe for menus, Google, and delivery apps.
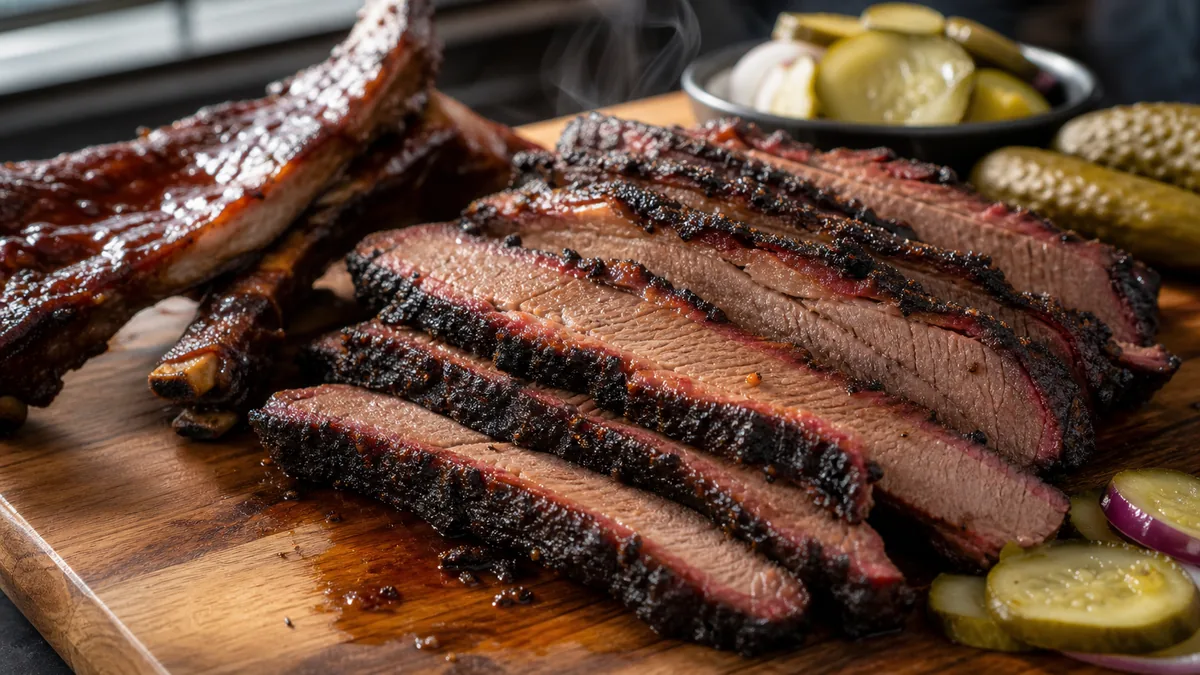
The goal is not the most dramatic photo. It is the clearest photo of texture: bark and char you can read, juicy interior on slices, and sauce that looks real instead of plastic.
Why BBQ is hard to shoot (and what actually fixes it)
Three problems cause almost every bad BBQ photo, and none of them are solved by filters:
- Dark food on a dark background confuses your phone’s auto-exposure, so it guesses and crushes detail.
- Overhead light flattens bark, char, and grain into a featureless blob.
- Glossy glaze catches a hard light source and turns into a white glare stripe.
Fix the lighting and the surface first. Editing comes last, and only to clean up — not to rescue a photo that was lit wrong.
The BBQ photo station (simple, repeatable, fast)
You do not need a studio. You need control and the same setup every week so your photos look like one brand.
- One key light from the side: a window or a single soft LED panel.
- One white bounce card opposite the light to lift shadows.
- One matte background: neutral stone, wood, or a dark board.
- A clean serving surface — butcher paper works and reads as authentic BBQ.
- A microfiber cloth for fingerprints and sauce smears on plate edges.
Why side light matters for BBQ
Side light creates small shadows, and those shadows are exactly what make bark, char marks, and the grain of sliced brisket readable. Move your phone to the 1x lens, keep it level with the food at a 30–45° angle, and let the light rake across the surface.
How to make dark meats look premium, not muddy
Dark food fails when the camera cannot separate the meat from the background. Three fixes solve almost all of it.
- Create contrast with light, not filters. Move the light to the side and use the bounce card to gently lift the shadow side.
- Give your phone something brighter to read. Place the meat on white butcher paper, a lighter board, or a clean light plate so auto-exposure does not crush everything to black.
- Do not crush blacks in editing. BBQ needs shadow detail. If you pull the blacks all the way down, the food becomes a silhouette and looks cheap.
The key takeaway: brighten the surface and the light direction first, and the dark-meat problem mostly disappears before you ever open an editor.
Glossy sauce without ugly glare
Glaze is beautiful until it becomes a white stripe across the frame. Remember that glare is a reflection you can move, not a flaw you fix later.
- Move the light higher and slightly to the side.
- Rotate the plate a few degrees and watch the highlight shift.
- Place a black card opposite the light to darken the reflection on shiny sauce.
- Wipe the plate edge so the remaining sheen lands on the meat, not on a smear.
You are shaping reflections, which is what real food stylists do — not “editing.”
Capturing smoke honestly
Smoke and steam are transparent, so they only show up against the right background and light.
- Plate the food the way you actually serve it.
- Place it so a darker area sits behind the rising smoke.
- Use backlight or side-backlight so the smoke catches the light.
- Fire 6–12 quick frames — smoke fades fast — and pick the frame where it is visible but not covering the hero ingredient.
Never add smoke that was not there. Customers notice fabricated drama, and trust is what produces second orders. If you want the broader principle on why accuracy converts, see our breakdown of why food photos make people order.
The 3 shots that sell BBQ
You do not need twenty angles. You need three that answer customer questions.
| Shot | What it shows | Where it works |
|---|---|---|
| Hero | Clean, plated, crop-safe; char and sauce visible | Menu, Google, delivery thumbnail |
| Inside / slice | Interior texture, real color (no gray meat) | Menu detail, delivery |
| Close texture | Bark, crisp edges, glaze sheen | Social, ads, promos |
Shoot the hero first, then the slice for two or three items, then a close texture crop for each hero. That set covers every surface customers see you on.
Per-item rules (brisket, ribs, pulled pork, wings, chicken)
- Brisket: slice cleanly, fan a few slices, show grain and bark. Avoid greasy piles and orange filters.
- Ribs: show the bone lines, shoot at a slight angle for thickness, keep sauce clean on the edges.
- Pulled pork: show strands and texture, add a clean bun or side for scale. Avoid overhead light that makes it look wet.
- Wings: emphasize crisp skin, keep highlights controlled so they do not read as oily.
- Grilled chicken: show char marks with side light, keep whites neutral so the meat does not go gray, and kill green casts from kitchen fluorescents.
Delivery and takeout: add a “packaging truth” shot
BBQ travels, so your photos should set expectations. For your top delivery items, add one honest shot of the tray or box as it actually arrives, with the portion visible and the frame clean. This single image reduces “it looked bigger in the photo” complaints and builds trust for first-time buyers. For platform-by-platform crop and sizing rules, see our guide to delivery app photo optimization.
The 45-minute BBQ photo sprint
This is how to refresh photos without stopping service.
- Prep (10 min): set up the station, pick your 5 top sellers, wipe plates and surfaces, pre-slice anything you slice to order.
- Shoot (25 min): hero first, then a slice shot for 2–3 items, then a close texture crop for each hero.
- Publish (10 min): enhance, export the crops you need, and upload to the menu, delivery apps, and Google.
A consistent weekly cadence beats one perfect annual shoot. If you want the full operational version, follow our restaurant menu photo SOP.
Editing rules: keep BBQ believable
Your goal is “clean and premium,” not “fake and glossy.”
- Lift shadows slightly so texture stays visible.
- Keep whites neutral on plates and paper.
- Preserve highlights — do not blow out the glaze.
- Avoid extreme sharpening (meat looks crunchy) and extreme saturation (sauce goes neon).
This is exactly where an honest enhancement tool earns its keep: it corrects lighting, color, and background clutter on your real dish without inventing food. You can try it on a single photo first with the FoodPhoto.ai.
Fast QA before you publish
- Can you identify the dish at thumbnail size?
- Does the portion match what you actually serve?
- Is sauce glare controlled (no white stripe)?
- Are the plate edges clean?
- Does it match the rest of your menu’s look?
If any answer is no, pick a different frame or reshoot — usually a 60-second fix with a slightly different light angle.
Dial in this BBQ workflow once and your smoke, char, and gloss will look premium everywhere customers find you. When you are ready to polish a batch, start with a Menu Test Pack and check pricing to keep your whole menu consistent.
Frequently asked questions
How do you photograph BBQ on a phone without it looking dark and muddy?
Use side light instead of overhead, add a white bounce card opposite the light, and place the meat on a lighter surface like butcher paper so your phone has something brighter to expose against. In editing, lift shadows slightly to keep bark and char detail instead of crushing the blacks to a silhouette.
How do I stop barbecue sauce from looking like a white glare stripe?
Glare is a reflection, not an editing problem. Move your light higher and more to the side, rotate the plate a few degrees, or place a black card opposite the light to cut the reflection on glossy sauce. Wipe the plate edge so any remaining highlight lands on the food, not the mess.
Should I add fake smoke or steam to a BBQ photo?
No. Capture real smoke by shooting against a darker background with backlight and firing 6 to 12 quick frames as it rises, then pick the frame where smoke is visible but not covering the hero. Added smoke that was not there reads as fake and erodes the trust that drives repeat orders.
What angles should I shoot for BBQ menu and delivery photos?
Three are enough: a clean plated hero, an inside or slice shot that shows interior texture, and a tight close-up of bark, crust, or sauce sheen. Those three cover menus, Google, delivery thumbnails, and social without reshooting.